zondag 15 mei 2011

The clutch

I'm hoping to finish the engine, clutch and gearbox assembly by the time the car has had its respray, so I can put the engine in in the garage where there's more and better equipment. So I had a look at the clutch.

The original clutch on the 240 has a 8 1/2" diameter. It's worn, and what's worse: it's not easy to come by. Furthermore, there was a pretty good clutch assembly with the wreck, but that's a 9" unit.

There's not only a diameter, but also a height difference.


The bearing is different too. The one on the left is the original 240 bearing (higher bearing for lower clutch), the other one is a replacement I've ordered - parts for the 9" clutch are easier to find.


Worn clutch plate on the left, better one on the right.


The threaded holes for the 9" clutch are already in place on the flywheel, the only thing in the way are these little positioning pins. I must get them out one way or the other, and put them in the holes that are also drilled but empty. Another course of action is to drill holes in the clutch cover but that seems like a crude approach.

Meanwhile, in the living room...

I've bought a couple of 1/18 scale models in a second hand store. After some Ebay hunting, I've found some more. I stick to the lower price range (around or under €20) - some scale models go up to or over €100, and that's more than I want to spend.


Instrument panel

On a sunny day, I set about rebuilding the instrument panel. As I assumed, the panel itself is symmetrical, so I've used the best one and cleaned it on both sides.


The meters from the 1961 Mk2 differ from the 1968 240 in some details. This is especially clear on the water temperature meter. Not only is one made in England and the other in the UK, but one indicates the temperature in °C and the doesn't give absolute numbers. Maybe this has something to do with LHD/RHD versions as well?


The amps meter on the older car has a "30" mark in the middle, the newer one doesn't.


In order to clean the meters, the rubber band has to be removed first.


In case the black rim doesn't turn, you can push in the lip under my index finger, and then both the glass, rim and dial turn and can be removed.


Here, the glass is removed and the lip can be seen.


The inside of the ammeter.


The meters and switches back in place. The rims of the meters were cleaned but not repainted as I'm afraid that paint-from-a-can won't achieve the desired result and the original paint is still in pretty good nick. The switches were cleaned, the chrome parts with "polychroom" chrome polish.


Slapping the wiring loom in place :-p


"Et voilĂ "
The cigar lighter isn't in place yet because it has to be rechromed, and the ignition lock isn't in place because I still have to change the locks.


There is a little difference in font between the original and the replacement item, but otherwise it's a perfect fit.

Carpets and trim

The car is at the garage and in my rare spare time I remove some of the paint before the repairs to the body can be carried out.

I'm also (still) working on removing the old veneer, the dashboard and glovebox veneer are much thicker and harder to remove. Steam doesn't help much, although it is good for removing varnish.

Meanwhile, I haven't exactly had much time to make real progress, but I did order the furflex, sound deadening felt and other trim stuff from Woolies.

As for the carpets, a new set in original material, cut to size and finished, would set me back €280 or so. Since I have the original carpets, I'm pretty sure I can cut them myself. So I've contacted a company that sells car carpets, Advotex in Opwijk. They had something roughly the same colour, not exactly the same texture but I don't care about that. As I've said before, the car should be clean and good, but not a concours winner. It turned out to be a roll of about 8m long by 1m, and because it had been lying around for a long time and they weren't planning on using it anymore, the man let me have it for 25€. A bargain.

donderdag 24 maart 2011

About the chrome

There's a lot of BS on the internet about chrome and its alternatives, I can tell you that. After reading lots of websites I was none the wiser until I had a chat with the kind people of Chromage Mossu, one of the few chroming companies in Belgium. They're only a couple of minutes drive away from me.
I've added up some numbers and it seemed that buying every chrome part on the car new (or having it exchanged) would add up to about €6000. Pretty steep. I've also asked for prices with other companies and one gave me a quote of about €4500. Still pretty steep. Meanwhile, I've learned why.

In this picture, from top to bottom: three times (almost) the same part, the B post moulding. The top one had one half sanded down and sprayed with chrome paint from a can. The middle one is "as it was", and the bottom one has been de-chromed by Mossu. As you can see, it's copper. (Also note: the top one is from the MK2, the bottom ones from the 240. On the Mk2 the B post moulding is 2 pieces, on the 240 the moulding is a bit bigger on the bottom and the second part isn't needed anymore.)


The difference between a (sloppy) chrome-from-a-can paint job - it was just a try - and real chrome.


Mr. Mossu said: "this is the finish you should achieve before rechroming".


Easier said than done on a part like this.


After the first sanding with a fine sanding disc. Better, but still no mirror finish.


After polishing with grey polishing paste and a cotton (or is it felt) thing on my drill. This is beginning to look like it.


Unfortunately, there still are some dents and things, so I'll probably start over but with a coarser sanding disc first.


I asked if the dechroming was really necessary. Apparently, chrome is very hard so it would require a lot of work to sand off the chrome. That's why it's better to have it removed chemically.

The good thing is: the most time-(and money)-consuming part about rechroming is the polishing. So if I do this myself I will save a lot of money. Not only that, it will also be a lot faster, because there's a waiting list of months if I'd have the polishing done by the chroming company. If I do it myself, there isn't much work to be done for them except hanging it in the chrome bath and some minor repair works, so they can do it "in between".

About the steering

It's not very clear from the SNG catalog, so for clarity:

These link arms CAN be rebushed.


These CAN NOT.

About the bumpers

Since I have the "fat" bumpers of the Mk II, I want to use them instead of the "slim" 240 bumpers. In my opinion, it's only really a Mk II if it has fat bumpers. However...

There's a difference in the rear valance and mounting points.


Luckily, the bolts are in the same place and it's just the mountings that are different:


And I was planning on replacing the rear valance anyway because it is quite badly damaged underneath. So I've ordered the "fat bumper" version.

Some of these mountings came off easily, some didn't.


The ones where I couldn't get the bolts loose were cut with a potato knife. Pretty easy and satisfying.


When I looked up the order code for these mountings in the SNG catalog I was surprised to learn that they cost about €40 each (x4). I've mailed Marcus who is always very helpful, and he pointed out that these mountings are exactly the same as the front engine mounts, so the alternative versions come to about €10 each. This is mentioned in the engine bay parts list, but not in the bumper parts list.

I had to grind off the nuts on the overriders because the bolts were turning freely and there was no way to hold them. I'll replace them with metric bolts.


As for the front bumpers, there's a difference as well: the "hooks" are different. Luckily, they're only attached with 2 bolts each so swapping them is no biggie. The front bolt is in a difficult place so you'll need a universal joint on your ratchet.

thin bumper


fat bumper. Sorry about the flash. Note difference in space between chassis and bumper holder.

About the veneer

It took me some phone calls and some driving around, but I've found somebody nearby with a vacuum press and experience in veneering. I've read on the internet that you could do it yourself with all sorts of home remedies, but I have serious doubts about that. I'm not talking about some new varnish, but real new veneer.

The man told me to remove the old veneer, so I took the wood parts out of the oldest car, because the veneer had started to come off anyway.

The sides are in a different veneer than the front, and both veneers are attached to a backing.


Hard to see the veneer under this crackled varnish


I've used varnish remover here, more out of curiosity than anything else, because I'm going to use new wood anyway. I've only done this on one part. The wood chipped off easily without removing the varnish so why bother...


The wonderful walnut veneer on the glove box. On the right, some of the varnish has been stripped of with a special tool. You can see the varnish really brings out the patterns in the wood.


You can see the veneer around the doors is coming off by itself. Also note that the parts above the doors do have a veneer front in this car. In the 240 they do not, they're just varnished solid wood. Probably to save money?


No high-tech equipment is needed... just a scraper and - as always - lots of patience.

zondag 27 februari 2011

RHD to LHD

(If you are wondering: LHD = Left Hand Drive, like in Europe, where we drive on the "right" side of the road, and RHD = Right Hand Drive, like in the car's native United Kingdom, where they say the steering wheel is on the "right" side of the car.)

Because I have the LHD wreck, I was contemplating converting the RHD car to LHD. The main question was: is it practicable? What needs to be changed? Here's what I've found so far.

1) The steering house is different. While most of the components of the steering house are - or seem to be - interchangeable between LHD and RHD, the housing itself is not symmetrical and can not be put on the other side of the axle.

2) The head lamp beams point in the opposite direction for Europe.

3) The instrument panel is mirrored. I think it's not technically necessery to change this in order to convert the car, but it might be somewhat more difficult to use.
I think - but I will be able to confirm this later - the cut-outs are symmetrical so you could swap everything around. The only problem would be that the strip with the names of the controls wouldn't be correct anymore, but that strip is available separately at about €15 and you'll probably want to replace it anyway.
The wiring loom has to be inversed as well. It doesn't seem too difficult.

LHD instrument panel.


RHD instrument panel.
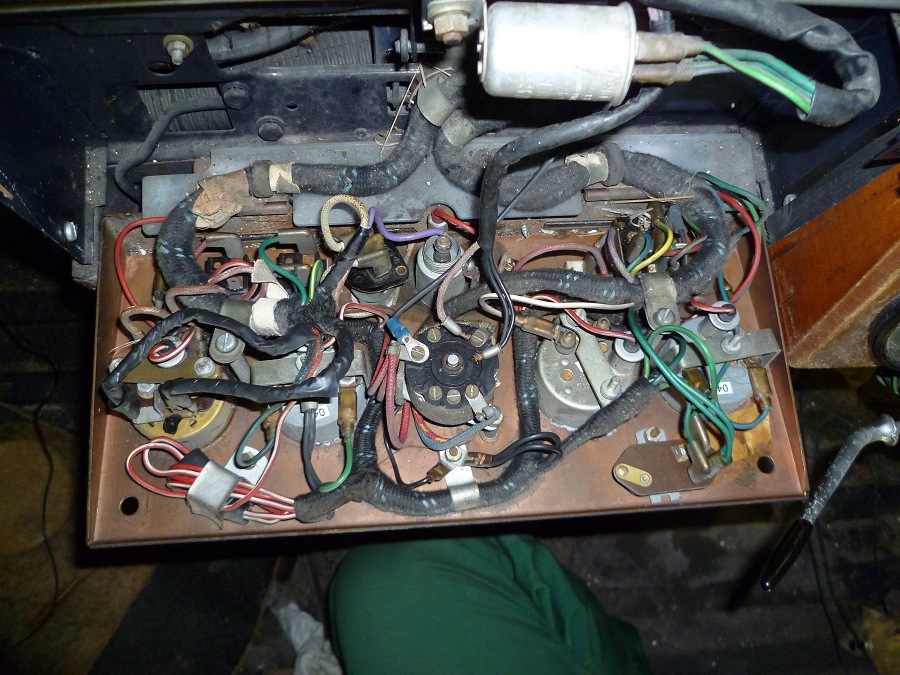

4) The wiring loom. Now for the good news: most of the wiring can stay where it is! So far I've only spotted a couple of wires that can easily be put in the correct position:
- The wiring to the dashboard
- The wiring to the dipper switch
- The wiring to the steering column
- The wiring to the handbrake
All of these are adressed below.

These wires near the doors must not be swapped!


5) The dashboard and it's wiring loom. The dashboard itself is not symmetrical. If you are considering reveneering, you might be able to cut out a new, mirrored dashboard. It can't be that hard (except for the reveneering of course). As for the wiring loom, you only need to place the thick loom for the dashboard and steering column from the right hand side to the left. It is flexible enough to do this.

6) The glove box. The same comment as for the dashboard: if you are reveneering, you could cut out a new mirrored glove box yourself. The box itself, which is in some kind of cardboard/felt material, is not interchangeable. This will require a lot more work if you want to make one yourself.

7) The steering column and its wiring. The wiring to the steering column is in the same bit of loom as the dashboard cables. I am not sure whether the steering column is the same for LHD as for RHD (I'll look it up in the parts list some time). The holes for the steering (and for the pedals and everything else) are there, some of them are covered with riveted plates that can easily be removed.

8) The hand brake and it's wiring. The hand brake seems to be attached with only one bolt. On the other side of the car, there's a rubber plug where I suppose I'll find a thread. I'm not sure yet whether all parts are interchangeable between LHD and RHD. I'll keep you informed as I progress.
Then there's the hand brake switch (to turn on the light) with the violet wire. This wire goes to the left hand side - even when the hand brake is on the right hand side in an RHD car. I'm not sure yet whether I can retrieve the wire on the left hand side or whether I'll connect it to a new cable running from right to left under the carpets.


The plugged hole.


9) The pedals, brake and clutch master cylinders and tubing and throttle pedal and linkage - for throttle and clutch pedal removal, see my previous post. The cylinders come out as well, and the tubing is somewhat different. I've contacted the Automec people; there is only one different tube between an LHD and RHD brake line kit. I'm not sure yet as for the clutch pipe, it might be the same length but in a different position. As for the throttle pedal, they are of different construction for LHD and RHD, and not interchangeable. See the pictures below. I don't think the linkage is interchangeable either.

RHD


LHD


The bolt holes seem to be there on the RHD car...


10) The dipper switch. Same switch, and the holes are there. You just need to reroute the wires that go to it, they go through a hole near the steering column. This should hardly present any problems.


It should go here.